Saturday, February 18, 2012

ConKerr Cancer

Here is a super easy way to give back with crafting. ConKerr Cancer is an organization that collects bright, cheery, handmade pillowcases to children's hospitals. What a great way to brighten up a hospital room! I figured this would be a pretty easy cause to donate to as I have quite a bit of scrap fabric laying around. And since finding out about ConKerr Cancer, I've been making sure to stop at the bargain bin whenever I go to the fabric store to see what I might be able to use. ConKerr Cancer's website has a tutorial on how to make pillowcases, but it doesn't have pictures. I love picture tutorials so I decided to make one myself.

You will need:
3/4 yard of fabric for the pillowcase
1/3 yard of fabric for the border

Cut the body of the case 26 1/2" by 40 1/2" and the border 10 1/2" by 40 1/2".  


Fold the border in half lengthwise, wrong sides together and press. Place the right side of the border to the right side of the pillowcase. Pin it together and sew with a 1/2" seam allowance.


Pin right sides of the pillowcase together and sew along the side and bottom with a 1/2" seam allowance.

Finish the seams so they don't fray. Flip it right side out and press.


Sunshiney goodness!!

** Please wash the fabric for the protection of the children with suppressed immunity. Please check with your local chapter for specific hospital washing instructions. In addition place each pillowcase in a ziplock bag. Pillowcases must be dropped off at a drop off site or mailed to the coordinator. Do not deliver directly to the hospitals. 

You can find your region's pillowcase drop off locations here. If you decide to make a pillowcase for ConKerr Cancer, please make a tutorial and leave me a comment! The more people who are making pillowcases and getting the word out there, the better! 


Linking up at:


Thursday, February 16, 2012

Giveaway at Craptastic!


Katie over at Craptastic is celebrating her one year blogiversary AND having 750 followers! In honor of this huge accomplishment, she is having the most wonderful giveaway. She is giving away a beautiful tote bag and travel bag. 
                                       

So head on over, enter the giveaway and check out her blog. She has some great tutorials. My personal favorites are the Double Wine Tote Bag and any of her pillows.

Congrats Katie!!!

Tuesday, February 14, 2012

Happy Valentine's Day!!!!!

I hope everyone is having a great day. One filled with love from both your Galentine's and your Valentine's! We celebrated Galentine's Day yesterday and had an absolute blast. Check out some of our wonderful decorations.


Heart themed display above the couch


Coffee table covered in hearts and pink and purple wine cheese!


What Valentine's Day is complete without cherubs?!?!


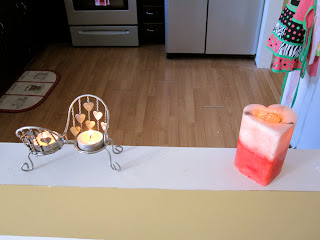
Don't you just love this candle holder? Its a little courting bench! Too cute.


Some love for the hallway.


And the bathroom.


And even the stove.

And last but not least, our beautiful table!

Everyone brought such wonderful treats! We had bleu cheesy eggs, cake batter pancakesheart-shaped cinnamon rolls, a cheese and sausage casserole and a fruit platter. And since we were celebrating breakfast style, we had mimosas! I'm sorry I didn't get more pictures of the food and activities. I was too busy eating and having fun!

Hope you all have a wonderful day!


Saturday, February 11, 2012

Plant Inspired Wall Art


The inspiration:

I found this over at Home Made Simple and fell in love. I thought it was so cute and it looked pretty easy. So I decided to take a stab at it with a few slight variations. I found the frames in the trash and my mom was planning on throwing away the mirror so I snagged it. I spray painted the frames white and used craft paint to paint the mirror's frame yellow. A little paint can go a long way in transforming outdated things!

First, gather your supplies. You'll need two pieces of cardstock (a top color and a bottom color) and some frames. An x-acto pen and cutting mat are helpful, but scissors will probably work too.


Sketch out a plant design. It does not have to be good. I am not very good (read: terrible artist) and I still managed to make it work. You just a general outline of what you want to do. Then, use your x-acto knife to cut out your shapes.

It doesn't have to be perfect, since you'll be flipping the paper over. Nobody will now that you strayed from the path just a little! 

Once everything is all cut out, layer up your papers, stick 'em the frame and put them up! 

I like the way the mirror looks added in with the nature-y art. This was a super easy project that really ads some flair to a boring wall. I had a lot of fun making it and since I'm not naturally artistic, it turned out way better than expected!


Keep in mind where you are going to hang these when finished. I hung it up opposite a yellow wall, so the mirror just looks like a yellow square. It will be moved to a new home eventually.
Happy crafting!


Featured at:


Linking up at:


Wednesday, February 8, 2012

Galentine's Day

What's Galentine's Day?!?! Only the best day of the year! Founded by Leslie Knope from Parks and Recreation and celebrated on February 13, it is chance to ladies to leave their husbands and boyfriends behind and kick it breakfast style. Ladies celebrating Ladies. Like Lilith Fair minus the angst. Plus frittatas.


You may receive gifts such as a bouquet of hand crocheted flower pens, a mosaic portrait of yourself made from crushed bottles of your favorite diet soda, a five thousand word personalized essay detailing how awesome you are or a needlepoint pillow of your face with the headline of a newspaper from the day you were born.


My friends and I have planned to host our very own Galentine's Day party, and while it might not be on par with Leslie's, we're giving it our best shot! Here are some of our ideas thus far.


Adorable Valentine's decorations.
Pink pom poms and flowers are a MUST! This pinkified table from Amanda Parker and Family is great inspiration!

Giant LOVE letters found at delish.

Heart Garland from homedit.

Melted Crayon Hearts from Martha Stewart

Once our place is decked out in all things pink and hearts, the festivities will begin! We still plan on kickin' it breakfast style, just with a little twist. Instead of eating out, we're staying in. That way, everyone can bring their favorite breakfast dish to share! I'm so excited to see what everyone comes up with. Here are some Valentine's inspired foods to motivate us!

Heart shaped goodness from funny potato.

Multi colored heart pancakes from Gatorade Military.

Cheesy-cute cards are so wonderful. I'm hoping everyone gets super creative with these!
Seen over at Oh Lovely Day. She has the cutest blog!

Free printables over at Pumpkins and Posies.

The Shabby Nest has a great tutorials for these!

I've already started gathering supplies and working on gifts. Galentine's Day is so fun! I'm making personalized placemats for everyone with their picture, newspaper headline from the day they were born, Billboard #1 song from the day they were born and then some other fun facts like celebrities who share their special day and gas prices from the day they were born! dMarie is a great resource for gathering all this info quickly!

I'll be posting pictures once we celebrate! Please comment and direct me to pictures if you decide to celebrate Galentine's Day too!


Tuesday, February 7, 2012

Cheese Grater Earring Holder

The inspiration:

My jewelry is a mess. My earrings are in a necklace box and my necklaces are scattered all over the place. I needed some organization in my life. I saw the wonderful idea of using a cheese grater to organize dangly earrings pinned all over pinterest and decided to make one for myself.

It is super easy. Anybody can do this adorable DIY organizer! The hardest part is finding a cheese grater. New ones can be expensive, so I just waited it out and found one for $2 on craigslist.

Spray paint your cheese grater.

Ta-da! World's cutest earring holder!

And another pulled back shot of what it looks like on a dresser.

Still adorable. My stud earrings and necklaces still need some work though. Any suggestions???


Saturday, February 4, 2012

Sweater Refashion-- Hat and Mittens


The inspiration:

It is very cold out. So I decided to make a hat and mittens!

Out of an old sweater:

Turn the sweater inside out. I used another hat to get the outline and then cut about one inch around the line. I would recommend pinning before you cut so the pieces stay together. I'd also recommend using the bottom of the sweater as the bottom of your hat so you don't have to hem the bottom.


Then just sew that sucker together and turn it right side out!

Try it on for size. See if it has weird ears.

Re-cut and re-sew.


Now onto the mittens. Trace your hand. I was able to get one mitten out of the body of the shirt. The other I had to take from the sleeve, which I cut open and folded in half.


Pin and cut.
Now take the cuff from the original sweater and cut those to however long you want the cuff of your mitten to be.

Now it gets a little complicated. Keeping the mitten pinned, flip it right side out. Flip the cuff inside out, roll it onto the mitten and pin.

Sew together and flip the cuff down.

Flip back inside out and sew the mitten part.

Then do the same thing with the other mitten and voilá!

Warm, cute, homemade and upcycled!! All my favorite things!

I decided to add some fabric puffs to the hat to spruce it up a bit too.

Go start sewing and be warm!


Linked up at: